Home

You’re Doing That Wrong is a journal of various successes and failures by Dan Sturm.

Smarter, More Flexible Viewer Frame Handles

The best thing about posting my amateur, hacky Nuke scripts on this blog is that you, the handsome readers of this site, are often much smarter than I am, and frequently write in with enhancements or improvements to my scripts.

Such was the case, recently, with my Automated Viewer Frame Handles script. Reader and Visual Effects Supervisor Sean Danischevsky sent me this:

def set_viewer_handles(head_handles, tail_handles):
  #from https://doingthatwrong.com/
  # set in and out points of viewer to script range minus handle frames
  # Get the node that is the current viewer
  v = nuke.activeViewer().node()
  # Get the first and last frames from the project settings
  firstFrame = nuke.Root()['first_frame'].value()
  lastFrame = nuke.Root()['last_frame'].value()
  # get a string for the new range and set this on the viewer
  newRange = str(int(firstFrame)+head_handles) + '-' + str(int(lastFrame) - tail_handles)
  v['frame_range_lock'].setValue(True)
  v['frame_range'].setValue(newRange)


# Add the commands to the Viewer Menu
nuke.menu('Nuke').addCommand('Viewer/Viewer Handles - 16f',
"set_viewer_handles(16, 16)")
nuke.menu('Nuke').addCommand('Viewer/Viewer Handles - 12f',
"set_viewer_handles(12, 12)")
nuke.menu('Nuke').addCommand('Viewer/Viewer Handles - 10f',
"set_viewer_handles(10, 10)")
nuke.menu('Nuke').addCommand('Viewer/Viewer Handles - 8f',
"set_viewer_handles(8, 8)")

In my original script, I had hard-coded the frame handle length into the function, and created duplicate functions for each of my different handle lengths. Sean, being much better at this than I am, created a single function that takes a handle length input from the function call. In his version, all that's required to add an alternative frame handle length to the menu options is to duplicate the line that adds the menu command, and change the handle length that's sent to the function. Sean also added the ability to set different head and tail handle lengths to the script.

In thanking Sean for sending me this improved version of the script, I mentioned that it seemed that he'd set up the function in a way that would make it easy to prompt users to input a handle length, should they require a custom handle that wasn't already in their menu options. To which he replied with this:

def set_viewer_range(head_handles= 10, tail_handles= 10, ask= False):
    # set in and out points of viewer to script range minus handle frames
    # from https://doingthatwrong.com/
    # with some tweaks by Sean Danischevsky 2017
    if ask:
        p= nuke.Panel('Set Viewer Handles')
        p.addSingleLineInput('Head', head_handles)
        p.addSingleLineInput('Tail', tail_handles)
        #show the panel
        ret = p.show()
        if ret:
            head_handles= p.value('Head')
            tail_handles= p.value('Tail')
        else:
            return

    #only positive integers, please
    head_handles= max(0, int(head_handles))
    tail_handles= max(0, int(tail_handles))

    # Get the node that is the current viewer
    v = nuke.activeViewer().node()

    # Get the first and last frames from the project settings
    firstFrame = nuke.Root()['first_frame'].value()
    lastFrame = nuke.Root()['last_frame'].value()

    # get a string for the new range and set this on the viewer
    newRange = str(int(firstFrame)+ head_handles) + '-' + str(int(lastFrame) - tail_handles)
    v['frame_range_lock'].setValue(True)
    v['frame_range'].setValue(newRange)


# Add the commands to the Viewer Menu
nuke.menu('Nuke').addCommand('Viewer/Viewer Handles - 16f',
"set_viewer_range(16, 16)")
nuke.menu('Nuke').addCommand('Viewer/Viewer Handles - 12f',
"set_viewer_range(12, 12)")
nuke.menu('Nuke').addCommand('Viewer/Viewer Handles - 10f',
"set_viewer_range(10, 10)")
nuke.menu('Nuke').addCommand('Viewer/Viewer Handles - 8f',
"set_viewer_range(8, 8)")
nuke.menu('Nuke').addCommand('Viewer/Viewer Handles - ask',
"set_viewer_range(ask= True)")

Now, in addition to the set, common handle lengths in the menu, there's now an option to prompt the user for input. The pop-up is pre-filled with a value of 10, something that can be customized, as well. It's a thing of beauty.

I'd like to thank Sean for sending me both of these scripts. He took my ugly, half-formed idea, simplified it and made it more flexible. I've already begun using his script in place of mine, and I suggest you do the same.
Managing Disk Cache (with a Hammer)

Throughout the course of a given project, I use a handful of applications to complete my work. At the moment, I edit in Avid MediaComposer and Final Cut Pro 7. I do my VFX work in NukeX. I review shots and conform sequences in Hiero. And I do final color correction in AfterEffects with Red Giant Colorista II. There’s an obvious advantage to using the right tool for the task at hand, but there’s a caveat that I almost never remember until it smacks me right in the face: disk space.

I’m not talking about the space required for digital negatives, plates, renders, or project files. No, the piece I always manage to forget is the massive disk cache each application in my workflow creates on my startup disk [1]. With single frames of a sequence ranging between 5 and 30Mb, and individual shot versions reaching well into double digits, disk cache can take up a ton of space. And since cache files are created whenever an element is changed and viewed, it’s not an easy task to estimate how much space will be used by a project ahead of time.

Most applications, including every application I use, have built in preferences designed to limit the size of the disk cache. Most also feature a big button labeled “Clear Disk Cache”. These preferences are great if you spend all your time in a single application, but are of little consolation when you’re halfway through previewing a shot in Nuke and OS X pops up telling you your startup disk is full. Once you’re in that sad, embarrassing moment, good luck getting AfterEffects to open so you can hit that “Clear Cache” button.

“To the Finder,” you say? Even if the Finder were responsive when your startup disk had less than 50Mb of free space, are you the kind of person that keeps a sticky note on your monitor listing the paths to all the buried, hidden cache folders for each application? Neither am I.

Historically, I’ve gone straight to my project’s Renders folder and deleted my 2 oldest exports, giving me about 6Gb of breathing room to go hunt down the various disk hogs. Not a great solution. What would be ideal is the ability to hit one keyboard shortcut, see a list of which applications are taking up space and, more importantly, how much space, then quickly purging the unnecessary files.

Normally, the sizes for AfterEffects, Nuke, and Hiero are in the double digits of Gigabytes. This screenshot was taken after using the script as intended.

The Script

cache.command:

#!/bin/sh  

clear  
echo Current Cache Size:  
echo      
du -c -h -s "/Users/dansturm/Library/Preferences/Adobe/After Effects/11.0/Adobe After Effects Disk Cache - Dan’s MacBook Pro.noindex/" "/var/tmp/nuke-u501/" "/var/tmp/hiero/" "/Avid MediaFiles/MXF/" "/Users/dansturm/Documents/Final Cut Pro Documents"  

echo      
read -p "Purge Cache files?(y/n) " -n 1 -r  
echo      
if [[ $REPLY =~ ^[Yy]$ ]]  
then
    rm -r "/Users/dansturm/Library/Preferences/Adobe/After Effects/11.0/Adobe After Effects Disk Cache - Dan’s MacBook Pro.noindex/"*
    rm -r "/var/tmp/nuke-u501/"*
    rm -r "/var/tmp/hiero/"*
    echo    
    echo Done!
    echo      
fi  

The script displays the space taken up by each application, the path to that cache folder, and a total of space used. It then prompts for a y/n input to delete the cache files.

Since managing Avid and Final Cut Pro media requires a bit more attention and nuance than a dumb hammer like this can provide, their disk usage is listed, but their files are not removed. If you modify the script to delete Avid of FCP media, allow me to preemptively say “I told you so” when your project becomes corrupted.

Details

I run the script with a FastScripts keyboard shortcut. I wanted to shortcut to open a new Terminal window to display the information, so the keybaord shortcut actually calls a second short script called cache.sh which takes care of that part:

#!/bin/sh  

chmod +x /Path/To/cache.command; open /Path/To/cache.command  

The paths for the cache folders are hard coded into the main script and, as I mentioned, not all items listed are deleted. I like to see as much information as possible, but manage the deletion list more carefully.

For me, the main offenders of disk cache consumption are AfterEffects and Nuke which, together, average nearly 200Gb of disk usage. Once I’ve dealt with those 2 applications, I don’t usually need to go hunting for more free space.

Next time I accidentally inevitably fill up my startup disk with cache files, it’ll take seconds to rectify, rather than a half hour of excruciatingly slow, manual effort.

Hooray for automation!


  1. While it’s true that, in almost every application, you can re-map the disk cache folder to any disk of your choice, the entire point of a disk cache is to have the fastest read/write speeds possible, and no disk I own is faster than my rMBP’s internal SSD.  ↩

Experiments in iSight Scripting

A week or two ago, a conversation with my girlfriend reminded me of this old video from the Defcon 18 Conference, in which a hacker by the name of Zoz recounts the tale of how he located and recovered his recently-stolen computer by way of some fancy Internet skills. In addition to being a great reminder about data safety and security, it’s a pretty damn funny story.

Re-watching the video reminded me I’ve always wanted to experiment with scripting the iSight camera on my MacBook Pro. Not necessarily for the purpose of having photo evidence in the event of a theft, but more as a fun exercise in scripting and automation. Maybe I’m easily entertained (rhetorical), but I found the process and results throughly enjoyable.

Command Line Tools

The first thing I needed was a command line interface to the iSight camera. Despite my best Googling efforts, I wasn’t able to find any native OS tools to fire the camera (I’m still not sure if there is one). But lucky for me, nearly every search I did pointed me to a free, no-longer-supported-but-still-functional CLI tool called iSightCapture. Installation is as simple as tossing it into /usr/local/bin.

Regarding syntax, here’s the pertinent information from the iSightCapture readme file:

isightcapture [-v] [-d] [-n frame-no] [-w width] [-h height] [-t jpg|png|tiff|bmp] output-filename

Options
-v output version information and exit
-d enable debugging messages. Off by default
-n capture nth-frame
-w output file pixel width. Defaults to 640 pixels.
-h output file pixel height. Defaults to 480 pixels.
-t output format - one of jpg, png, tiff or bmp. Defaults to JPEG.

Examples
$ ./isightcapture image.jpg
will output a 640x480 image in JPEG format

$ ./isightcapture -w 320 -h 240 -t png image.png
will output a scaled 320x240 image in PNG format

Triggering

I wanted the ability to remotely trigger the iSight camera from my phone, and have it run for a predefined interval of time. To do this, I’d use a watch folder and a trigger file, uploaded from my phone, to initiate the script. This would theoretically be the method I’d use to “gather photographic evidence” in the event my laptop is stolen.

As usual, to set this up, I turned to my trusty friend Dropbox. To keep things tidy, I needed a couple of folders. The directory structure looks like this:

  • iSight_backup
    • scripts
    • trigger

The photos taken by the script will be placed in the top level directory, iSight_backup. The script itself would be placed in the scripts folder, and the trigger folder remains empty, awaiting a text file to be uploaded via Dropbox on my phone.

The Script

Here’s the script, called isbackup_t.bash, and saved into my iSight_backup/scripts/ folder:

#!/bin/bash  

#   path to iSightCapture CLI tool  
APPP="/usr/local/bin/isightcapture"  

#   path to Dropbox folder to receive photos  
FPATH="/Path/To/Dropbox/iSight_backup/" 

#   path to trigger file  
TPATH="/Path/To/Dropbox/iSight_backup/trigger/"  

#   select photo filetype; jpg, png, tiff, or bmp  
XTN=".jpg"  

#   number of photos to take  
PNUM="24"  

#   interval between photos (seconds)  
PINT="300"  

for i in `seq 1 $PNUM`;  
    do
        DTS=$(date -u +"%F--%H-%M-%S")  
        $APPP "$FPATH$DTS$XTN"  
        sleep $PINT  
    done  

rm $TPATH*  

The Details

Each photo gets a date and time stamp added to the file name for easy sorting. Since the FPATH destination is set to a folder within my Dropbox, and each file is a 640x480 jpeg, approximately 25kb in size, I can see the resulting photos on my phone just seconds after their taken.

By setting PNUM to 24, and PINT to 300, the script will take a photo every 5 minutes, for the next 2 hours, then stop until I upload another trigger file. However, since the script itself lives in Dropbox, I can change the interval or duration variables from my iOS text editor at any time.

Tying The Room Together

All that’s left to complete our little project is to create a launchd task to keep an eye on our trigger folder, and fire up the script if anything lands inside. Since creating, modifying, or using launchd tasks via any method other than a GUI is currently beyond me, I turned to Lingon.

Here’s the resulting launchd task:

<?xml version="1.0" encoding="UTF-8"?>
<!DOCTYPE plist PUBLIC "-//Apple//DTD PLIST 1.0//EN" "http://www.apple.com/DTDs/PropertyList-1.0.dtd">
<plist version="1.0">
<dict>
    <key>Label</key>
    <string>isbackup triggered</string>
    <key>ProgramArguments</key>
    <array>
        <string>bash</string>
        <string>/Path/To/Dropbox/iSight_backup/scripts/isbackup_t.bash</string>
    </array>
    <key>QueueDirectories</key>
    <array>
        <string>/Path/To/Dropbox/iSight_backup/trigger</string>
    </array>
</dict>
</plist>

And just like that, we’ve got a setup that will monitor our trigger folder, fire up our script when it sees anything inside, and save each file to our Dropbox.

Extra Credit

During my research for this project, I found a number of people using iSightCapture for things other than a makeshift security tool. Some, for example, used it to take a self portrait at login every day and auto-upload it to an online photo diary.

I thought that was a fun idea, so I wrote a second, shorter version of my script to automatically take a shot every 2 hours without the need for a trigger. For my version, however, I was most definitely not interested in auto-uploading the photos.

The script:

#!/bin/bash

APPP="/usr/local/bin/isightcapture"
FPATH="/Path/To/Dropbox/iSight_backup/"
DTS=$(date -u +"%F--%H-%M-%S")
XTN=".jpg"

$APPP "$FPATH$DTS$XTN"

And the launchd task:

<?xml version="1.0" encoding="UTF-8"?>
<!DOCTYPE plist PUBLIC "-//Apple//DTD PLIST 1.0//EN" "http://www.apple.com/DTDs/PropertyList-1.0.dtd">
<plist version="1.0">
<dict>
    <key>Disabled</key>
    <false/>
    <key>KeepAlive</key>
    <false/>
    <key>Label</key>
    <string>IS Secuirty</string>
    <key>ProgramArguments</key>
    <array>
        <string>bash</string>
        <string>/Path/To/Dropbox/iSight_backup/scripts/isbackup.bash</string>
    </array>
    <key>QueueDirectories</key>
    <array/>
    <key>RunAtLoad</key>
    <true/>
    <key>StartInterval</key>
    <integer>7200</integer>
</dict>
</plist>

Since I typically use a multiple monitor setup when working, I almost never see the green light come on when the script runs and when I check the photo directory, usually the beginning of the next day, I’m treated to at least a couple hilarious images. Like these, for example:

Hi Merlin!

I may be asleep in this photo. I can't tell.

No, that's not my poster. My girlfriend got to decorate that side of the room.

Yes, It makes Skype calls awkward. Then again, so does that hair.

Cleanup

Despite the photos being almost inconsequentially small in file size, I really don’t need to be keeping a long-running historical record of my disheveled appearance. To keep things from getting unwieldy, I created a Hazel rule that deletes files older than 2 weeks. I see no reason I’d need to keep them any longer than that.

Why?

I don’t know if it’s because this little project was so different from my day to day work, or I thought it would be a genuinely useful security tool, or I’m a narcissist that loves seeing pictures of himself (again, rhetorical), but I had a blast playing around with this little project.

As with nearly everything on this blog, I learned some things, failed a few times, and came out the other side with a fun little script I can demo to people, making it absolutely certain they’ll never ask me anything about computers again.

Running Scripts with TextExpander

I love that the Internet is full of smart people making and sharing awesome things. Like Dr. Drang and his Tidying Markdown Reference Links script. Seth Brown’s formd is another great tool I don’t know how I ever lived without. But, being the amateur that I am, I always struggle to figure out just how to use the scripts these amazing programmers have been kind enough to provide.

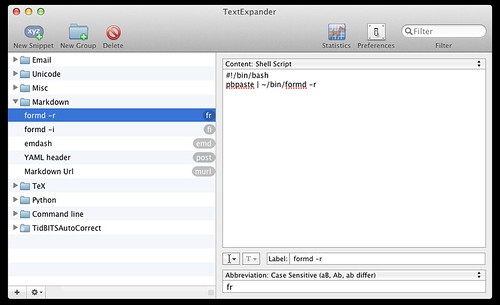
Lucky for me (and you), I’m able to play along with the help of everyone’s favorite writing tool, TextExpander. In the documentation for formd, Seth was gracious enough to spell it out for us laypersons[1].


To run formd with TextExpander, simply place the Markdown text to convert onto the clipboard and issue the appropriate TextExpander shortcut (I use fr or fi for referenced or inline, respectively).

It took longer than I’d like to admit, but eventually I realized this snippet could be tweaked to run any script I happen to download from a coder more skilled than myself. Additionally, since most of the scripts I want to use are built for processing text, the copy/paste activation generally works great.

#!/bin/bash
pbpaste | python /Path/To/Your/Script/script.py

With this short snippet, I can copy my text to be processed, invoke the script snippet of my choosing, and have the results immediately pasted back into my text editor, email, or wherever.

This particular snippet assumes you’re running a python script, but you can just as easily swap python for ruby or perl. Or you can omit the python call if you’re just running a standard Bash command. As long as it’s a valid command that would run in the Terminal[2], you can automate it this way. And, just as with formd, to use the snippet, you simply Copy the text to be processed, and invoke the snippet.

Boom. Done. Life is grand.

While none of this is new or revolutionary, connecting the dots between TextExpander and the Terminal is something I wish I’d have discovered long ago and, therefore, may be of interest to you.

Of course none of this would be possible without the amazing minds that write the scripts in the first place. So, along with this post, I offer a sincere Thank You to Dr. Drang and his site And now it’s all this, as well as Seth Brown and his site Dr. Bunsen.


  1. Layfolk? Laypeople? Missing the point?  ↩

  2. And frankly, I just start trying things in the Terminal until I find the correct command.  ↩